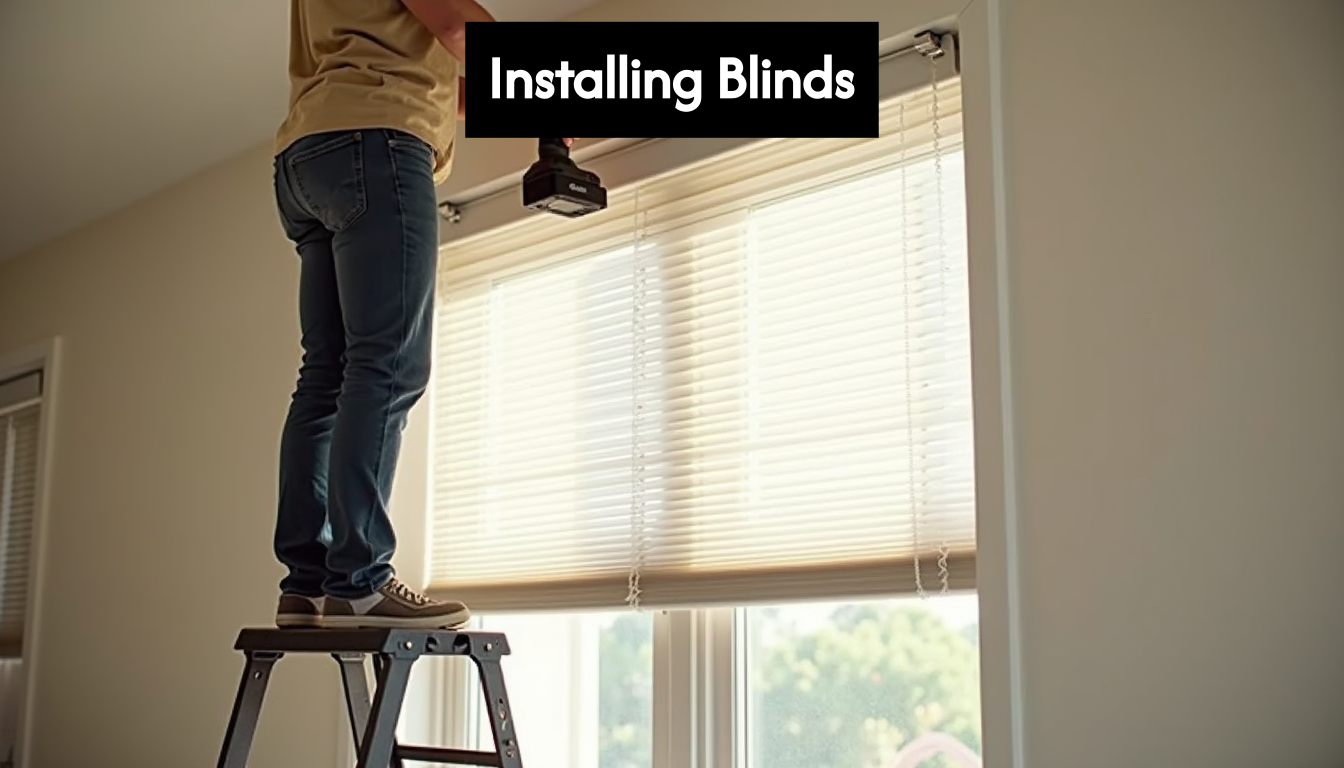
Installing window blinds may seem straightforward, but the reality is far more intricate. A successful installation can enhance a window’s energy efficiency by up to 25 percent as reported by industry experts. Yet, many struggle with this seemingly simple DIY task, leaving them frustrated and their homes less inviting. The true surprise lies in the meticulous attention to detail required for a flawless fit. When you arm yourself with the right tools and techniques, you transform a daunting challenge into a rewarding home improvement project.
Table of Contents
- Gather Your Tools And Materials
- Measure And Mark Your Window
- Install Mounting Brackets Securely
- Fit And Test Your New Blinds
Quick Summary
| Takeaway | Explanation |
|---|---|
| Gather Essential Tools | A quality measuring tape, electrical drill, screwdrivers, step ladder, and level are crucial for precise installation of window blinds. |
| Accurate Measurement Techniques | Take multiple measurements at different points for both inside and outside mounts to ensure a proper fit and avoid complications during installation. |
| Secure Mounting Brackets | Ensure brackets are perfectly positioned and aligned for a stable foundation, as improper installation can lead to uneven blinds and functional issues. |
| Comprehensive Testing and Adjustments | Test blinds for smooth operation and make necessary adjustments to guarantee they function well and provide optimal light control and privacy. |
Gather Your Tools and Materials
Successful installation of window blinds requires careful preparation and the right equipment. Before diving into the installation process, assembling a comprehensive toolkit and understanding the necessary materials will save you time, prevent frustration, and ensure a professional-looking result.
Essential Tools for Precise Blind Installation
Professional and DIY installers alike know that having the right tools makes all the difference when installing window blinds. Your basic toolkit should include several key items that will streamline the entire process. A quality measuring tape is non-negotiable, enabling you to capture precise window dimensions with accuracy. Digital measuring tools can provide even more precise measurements, ensuring your blinds fit perfectly.
Your electrical drill becomes an indispensable companion during blind installation. Select a drill with multiple bits – particularly masonry bits for brick or concrete walls, and standard drill bits for wooden surfaces. A set of screwdrivers, including both Phillips-head and flat-head varieties, will help you secure mounting brackets and make minor adjustments. According to Energy.gov, proper installation can significantly impact a window’s energy efficiency, making precision critical.
Additional tools that elevate your installation game include a sturdy step ladder for reaching higher windows, a reliable pencil for marking mounting points, and a utility knife for trimming excess cord lengths. A level is another crucial tool that prevents uneven mounting and ensures your blinds hang straight.
Selecting the Right Materials and Hardware
Beyond tools, selecting appropriate materials and hardware is paramount. Your blind installation kit typically includes mounting brackets, screws, wall anchors, and sometimes specialized mounting hardware depending on your window type. When purchasing blinds, verify that the included hardware matches your specific wall composition – whether you’re working with drywall, brick, concrete, or wooden surfaces.
Consider the weight and size of your chosen blinds when selecting wall anchors. Lightweight vinyl or fabric blinds require different anchoring compared to heavy wooden or metal blinds. Research from professional installation experts suggests using expandable wall anchors for drywall and masonry anchors for brick or concrete surfaces to ensure secure mounting.
Preparation and Safety Considerations
Before beginning installation, conduct a thorough workspace preparation. Clear the area around your windows, protect flooring with drop cloths, and ensure you have adequate lighting. Safety should always be a priority – wear safety glasses when drilling and use a stable ladder that can support your weight.
Organize your tools and materials beforehand, creating a systematic workspace that allows smooth movement and reduces the likelihood of misplacing critical components. Keep a small container nearby to collect screws and small parts, preventing potential loss during the installation process.
By investing time in gathering the right tools and materials, you’re setting the stage for a successful window blind installation. Precision, preparation, and the proper equipment transform what could be a challenging task into a manageable and satisfying home improvement project.
Measure and Mark Your Window
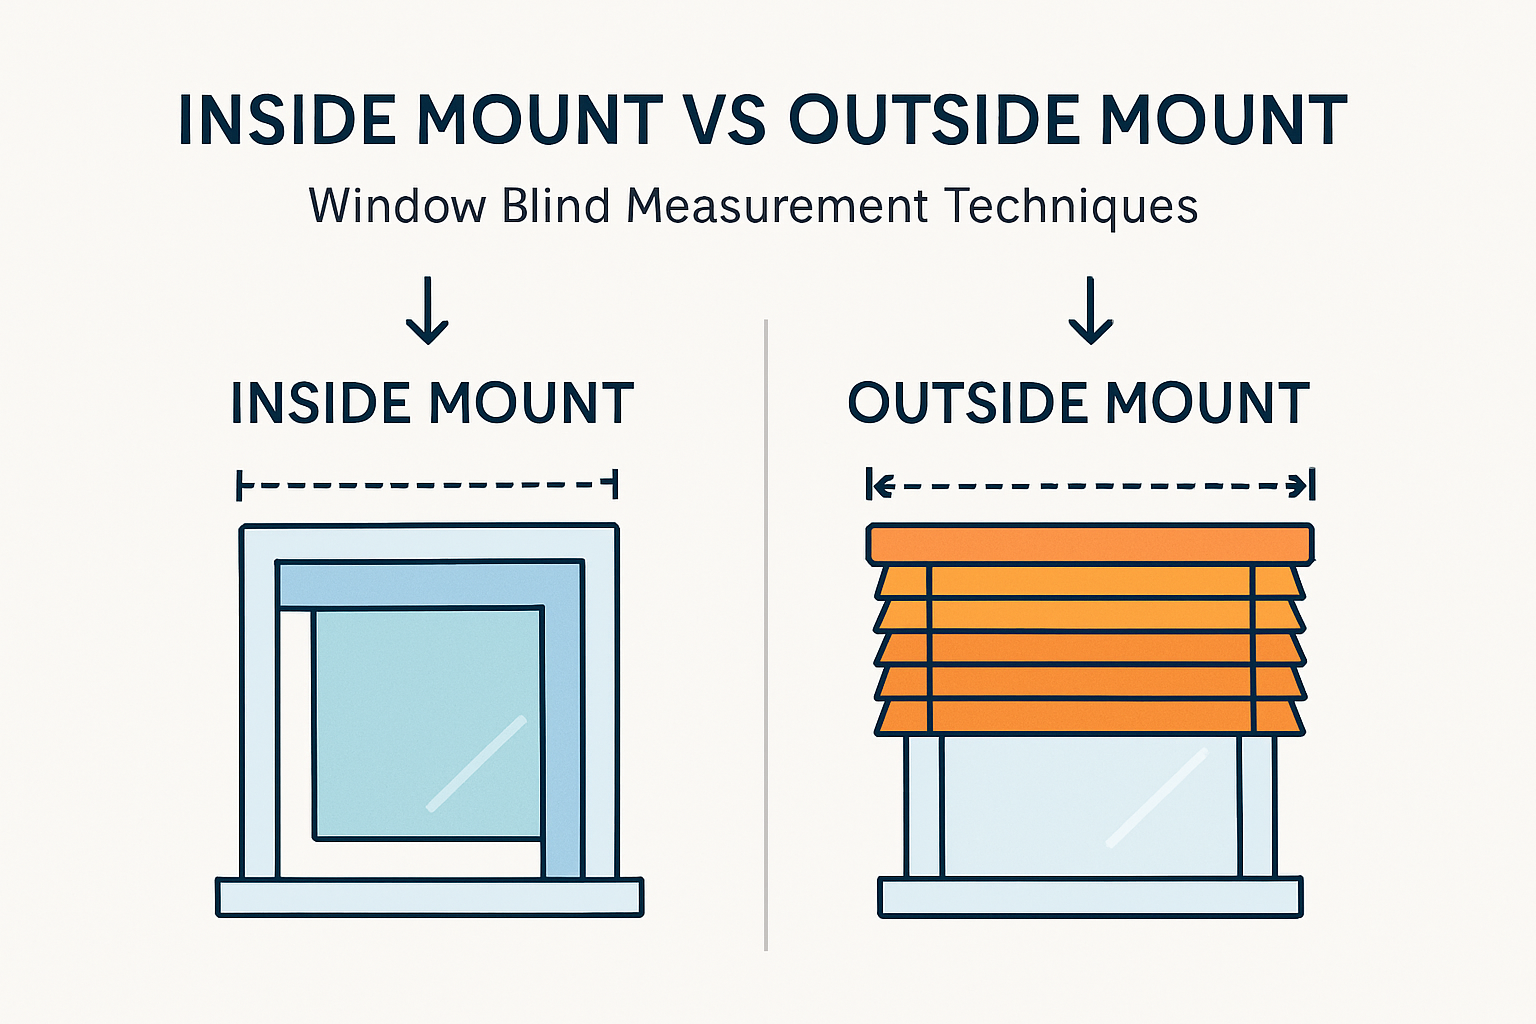
Accurate measurements form the foundation of a successful window blind installation. The precision of your measuring technique determines how well your blinds will fit, function, and look in your space. Understanding the nuanced differences between inside and outside mount installations is crucial for achieving professional results.
Understanding Measurement Techniques
Measuring window dimensions is far more complex than simply running a tape measure across the frame. Professional installers recommend a systematic approach that accounts for variations in window geometry. Levolor’s installation guide emphasizes taking multiple measurements to ensure accuracy.
For inside mount blinds, precision is paramount. Measure the width inside the window frame at three distinct points: top, middle, and bottom. Surprisingly, these measurements might differ slightly due to subtle architectural imperfections. Use the shortest width measurement to ensure your blinds will fit comfortably. Similarly, measure the height vertically in three locations—left, middle, and right—and select the longest measurement. This approach accommodates potential frame irregularities and prevents installation complications.
Inside vs Outside Mount Considerations
Outside mount installations offer more flexibility but require different measurement strategies. Here, you’ll measure beyond the window frame, creating a more dramatic visual effect. According to professional installation recommendations, add at least 3/4 inch of overlap on each side of the window frame. This additional width serves two critical purposes: enhanced light control and the illusion of larger windows.
When measuring for outside mounts, determine horizontal placement between the outermost points where window coverings will be installed. Use a metal tape measure for unparalleled accuracy, measuring to the nearest 1/8 inch. Avoid rounding down, as even minor discrepancies can compromise blind fit and functionality.
Marking and Preparation Techniques
After obtaining precise measurements, marking becomes the next critical step. Use a pencil with a sharp point for creating precise, easily erasable marks. A digital laser level can be an invaluable tool, ensuring your mounting brackets are perfectly horizontal and vertically aligned.
Create clear, visible marks indicating exact bracket placement. Consider using painter’s tape to create temporary alignment guides, which can be removed without damaging wall surfaces. These markings should be crisp and unambiguous, serving as a reliable reference during the actual installation process.
Remember that windows are rarely perfectly square. Small variations of 1/8 to 1/4 inch are common in both new and older constructions. Your measurement and marking technique must account for these subtle irregularities. Taking your time during this preparatory phase will save significant frustration during actual installation.
Precision in measuring and marking transforms window blind installation from a potentially challenging task to a manageable home improvement project. By approaching this stage methodically and with attention to detail, you’re setting the stage for a professional-looking result that enhances both the functionality and aesthetic appeal of your windows.
Install Mounting Brackets Securely
Securing mounting brackets is a critical phase in window blind installation that demands precision, attention to detail, and methodical execution. Your entire blind installation’s success hinges on these seemingly simple components, which serve as the foundational support for your window treatment.
Bracket Positioning Fundamentals
Professional installers understand that bracket placement is more than just randomly attaching hardware to walls. According to Blinds.com installation guidelines, precise positioning is paramount. For inside mount installations, brackets must be positioned flush with the wall’s surface in the upper window frame corners, ensuring they do not interfere with the blind’s operational mechanisms.
When preparing for outside mount installations, a strategic approach is essential. Restoration Hardware’s installation guide recommends centering the blind against the window and marking bracket locations just below the headrail. Critically, extend these marks approximately ⅛" beyond the headrail ends to provide optimal support and prevent potential alignment issues.
Drilling and Anchoring Techniques
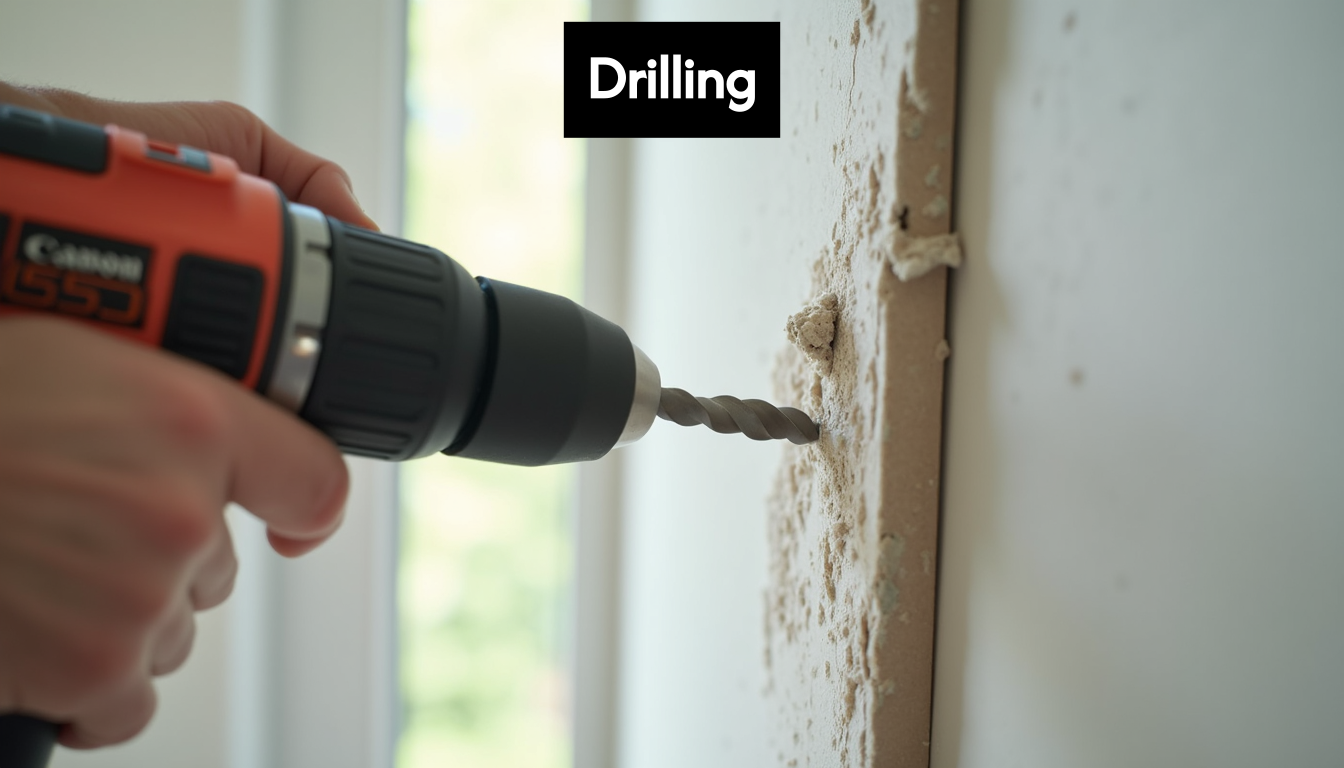
The drilling process requires unwavering precision. Select drill bits matching your wall’s composition – masonry bits for brick or concrete, standard bits for wooden surfaces. When drilling, maintain a steady hand and apply consistent pressure to create clean, accurate holes. For drywall installations, use appropriate wall anchors that match the weight of your blinds.
Pay close attention to the vertical alignment of your brackets. Even a slight deviation can result in uneven blind hanging, compromising both aesthetic appeal and functional performance. Utilize a digital laser level to ensure absolute horizontal precision. This tool eliminates guesswork and provides a professional-grade reference point for bracket placement.
Advanced Bracket Installation Considerations
Levolor’s installation instructions highlight crucial nuances for box bracket installations. Before mounting, release the locking tab on the bracket’s bottom and lift the front gate. For larger blinds requiring center support, space additional brackets evenly – no more than 30 inches apart – to prevent sagging and ensure structural integrity.
Consider the weight distribution of your blinds when planning bracket placement. Heavier materials like wooden blinds demand more robust anchoring compared to lightweight fabric or vinyl options. Test the stability of each bracket after initial installation by applying gentle pressure, verifying they can support the blind’s weight without shifting.
Remember that mounting brackets are more than mere attachment points; they are the critical interface between your window frame and window treatment. Investing time in meticulous bracket installation transforms a potentially challenging home improvement task into a seamless, professional-looking result. Patience, precision, and attention to detail will ensure your blinds not only look exceptional but function flawlessly for years to come.
Fit and Test Your New Blinds
With mounting brackets securely in place, the final stage of window blind installation involves carefully fitting the blinds and conducting comprehensive functionality tests. This crucial phase ensures your window coverings not only look aesthetically pleasing but operate smoothly and safely.
Initial Blind Placement and Fitting
Carefully lift your blinds and align them with the previously installed mounting brackets. For inside mount installations, the blinds should fit snugly within the window frame, with minimal gap between the blind’s edges and the frame. Gently snap or slide the blind’s headrail into the mounting brackets, ensuring a secure and level fit.
For outside mount blinds, verify that the blinds extend beyond the window frame as planned during your earlier measurements. Energy efficiency research indicates that proper window covering installation can significantly impact a room’s thermal performance, making precise positioning critical.
Operational Testing and Adjustment
Once mounted, conduct a comprehensive operational test. Slowly raise and lower the blinds, observing their movement for smoothness and evenness. Check that the cord mechanism operates without snagging or uneven resistance. According to Consumer Product Safety Commission guidelines, ensure cord stops are properly installed to limit inner lift cord movement, which is essential for both functionality and child safety.
Pay close attention to vane rotation for vertical blinds and slat alignment for horizontal blinds. Each movement should be fluid and consistent. If you notice any resistance or uneven motion, minor adjustments to the mounting brackets or blind placement might be necessary. Sometimes, a slight repositioning can resolve operational issues.
Fine-Tuning and Safety Verification
Verify the blind’s balance by observing its positioning when partially raised or lowered. The blinds should hang straight and remain level, without tilting or pulling to one side. For horizontal blinds, check that slats open and close uniformly. With vertical blinds, ensure vanes rotate freely and stack neatly when fully opened.
Additionally, test the blind’s light-blocking capabilities by fully closing them during different times of day. This helps confirm they provide the desired level of privacy and light control. Home improvement experts recommend multiple positioning tests to ensure optimal performance across various lighting conditions.
Remember that most homeowners rarely adjust their window coverings daily, making the initial installation and testing phase critically important. Take your time during this final stage, making incremental adjustments to achieve perfect alignment and functionality. A meticulously installed set of blinds not only enhances your space’s aesthetic appeal but also provides years of reliable performance, light control, and energy efficiency.
Frequently Asked Questions
What tools are essential for installing window blinds?
A quality measuring tape, electrical drill, screwdrivers, step ladder, level, and a utility knife are crucial for a precise installation of window blinds.
How do I accurately measure my windows for blinds?
For inside mounts, measure the width at three points (top, middle, bottom) and the height at three points (left, middle, right), using the shortest width and longest height measurements for the best fit.
What are the differences between inside and outside mount installations?
Inside mount blinds fit within the window frame, requiring precise measurements, while outside mount blinds extend beyond the frame, providing more light control and a larger visual effect.
How can I ensure my blinds operate smoothly after installation?
Conduct a comprehensive operational test by raising and lowering the blinds to check for smooth movement, making necessary adjustments to the mounting brackets or blind placement if any resistance is found.
Elevate Your Window Blind Experience with Urban Studio Designs
Installing window blinds can be a daunting task, especially when striving for that perfect fit and enhanced energy efficiency as outlined in your installation guide. If you’ve ever found yourself frustrated by misaligned brackets or underwhelming blind performance, we understand your pain. The meticulous process of measuring and ensuring installation stability is critical for a polished finish – which is why we’re here to provide a stress-free solution.

At Urban Studio Designs, we go beyond just providing custom-made blinds and coverings; we offer you peace of mind. With our extensive selection of durable, stylish blinds and shutters — both indoor and outdoor — hand-crafted to fit your precise needs, you’re not only ensuring an aesthetic upgrade but also maximising energy efficiency.
Why wait? Explore our vibrant colour options and styles that perfectly complement your décor scheme — and take the first step towards transforming your space today! Visit us at Urban Studio Designs to discover your perfect blinds and experience a smoother, hassle-free installation process with the quality and support you deserve. Act now! Your windows deserve this upgrade!